This guide follows one payment from start to finish: raising the requisition, getting it approved, paying it (in full or in parts), and retiring it with VAT and withholding tax. Everything happens in the Case Manager, under Requisitions. Requisitions are available on the Professional plan.
The journey at a glance
| Stage | Who | What happens | Status afterwards |
|---|---|---|---|
| 1. Raise | Requester | Fill in the requisition and submit it | Submitted |
| 2. Approve | Approvers | Each person in the chain signs for the full amount | Approved |
| 3. Pay | Finance (the payer) | Record each payment, with the date the money moved | Disbursed |
| 4. Confirm receipt | Requester, staff advances only | Confirm the money arrived, if your firm uses this step | Received |
| 5. Retire | Requester | Report what was really spent, with VAT and withholding tax | Retirement submitted |
| 6. Settle and close | Approvers, then finance | Approve the retirement, then settle any balance | Retired |
Stage 1: Raise the requisition
- Open Requisitions and click New requisition.
- Link it to a case if the money belongs to one. If your firm uses a review officer, you may be asked to choose one for case requisitions.
- Complete the request details: unit or department, designation, project, activity and currency.
- Choose the Payment type. Direct payment goes to a vendor or beneficiary. Advance to staff gives money to a staff member to spend and account for.
- Add the payee, then one line for each item to pay. Picking a vendor fills in their bank details and shows the rest of their record, and warns you if their currency differs from the requisition’s. The total updates as you type.
- Save it as a draft, or sign and submit it for approval.
An assistant can raise a requisition for someone else if a delegation is set up. It is recorded under that person’s name, and the assistant is tracked for audit. For the fields and setup in more detail, see Requisitions: request and approve payments.
Stage 2: Approval
The requisition goes to the approvers set in Settings, Approval Policy. They always approve the full amount, even if you already know it will be paid in parts. Part payment only begins at the next stage.
An approver can approve, decline, or send it back. If it comes back as Changes Requested, edit it and submit it again. See Approvals: review and sign off.
Stage 3: Pay
Once a requisition is approved, the person who pays requisitions opens it. Three buttons are available before any money goes out:
- Record payment: record money that has been sent.
- Request changes: send it back to the requester with a comment. When they resubmit, the approval chain signs again.
- Decline: refuse it with a reason. Nothing is paid.
Request changes and Decline disappear after the first payment, because money has left the firm.
Record a payment
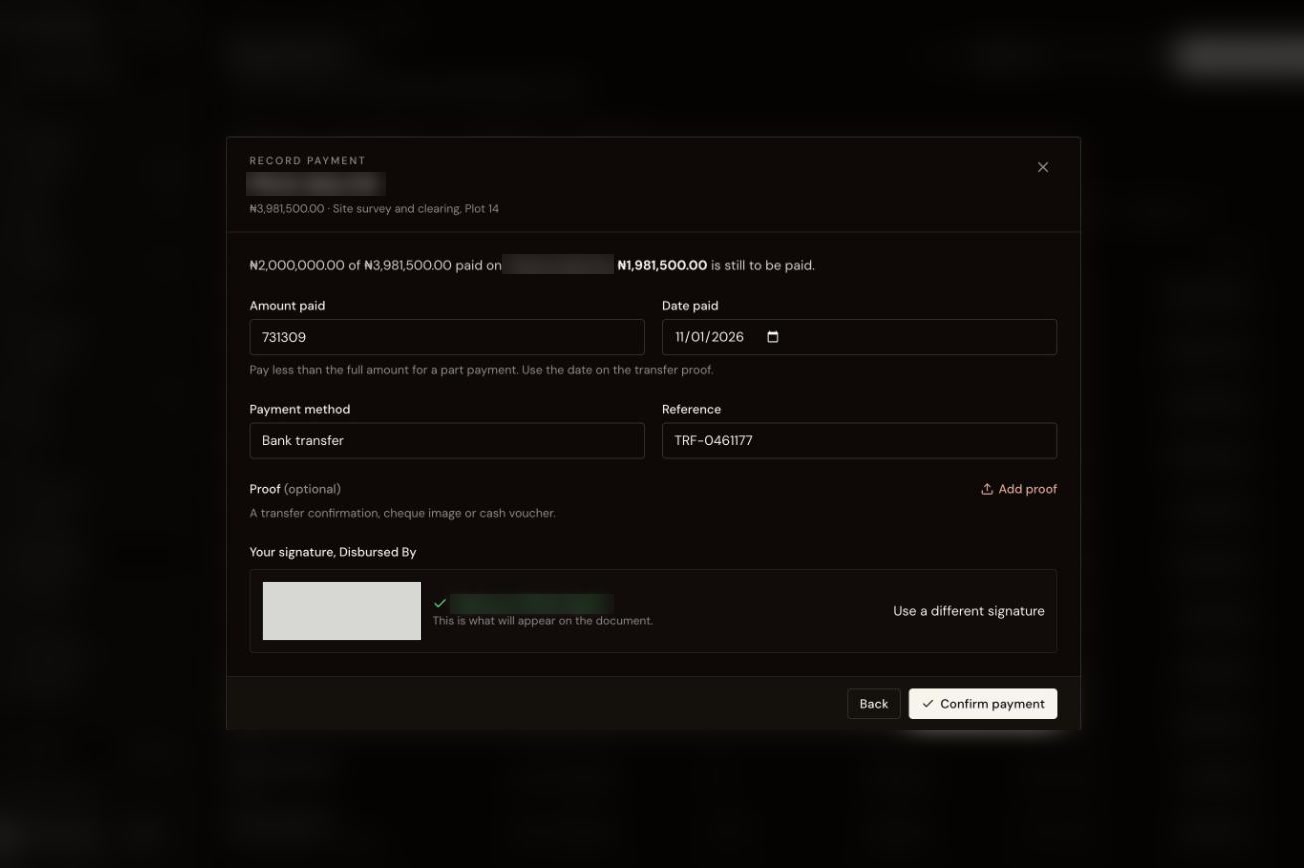
- Click Record payment.
- Amount paid starts at everything still owed. Leave it to pay in full, or type a smaller amount to pay part of it.
- Date paid: pick the date on the transfer proof. Past dates are fine; future dates are not.
- Add the Payment method and Reference, and use Add proof to attach the transfer confirmation.
- Sign and click Confirm payment.
Paying in parts
There is no separate part payment option. Typing less than the full amount is a part payment. The requisition then shows Disbursed, how much is paid, how much is still to pay, and a Record another payment button. Use that button for each later transfer. Every payment is listed with its own date, method, reference and proof, and the requisition PDF carries the same list.
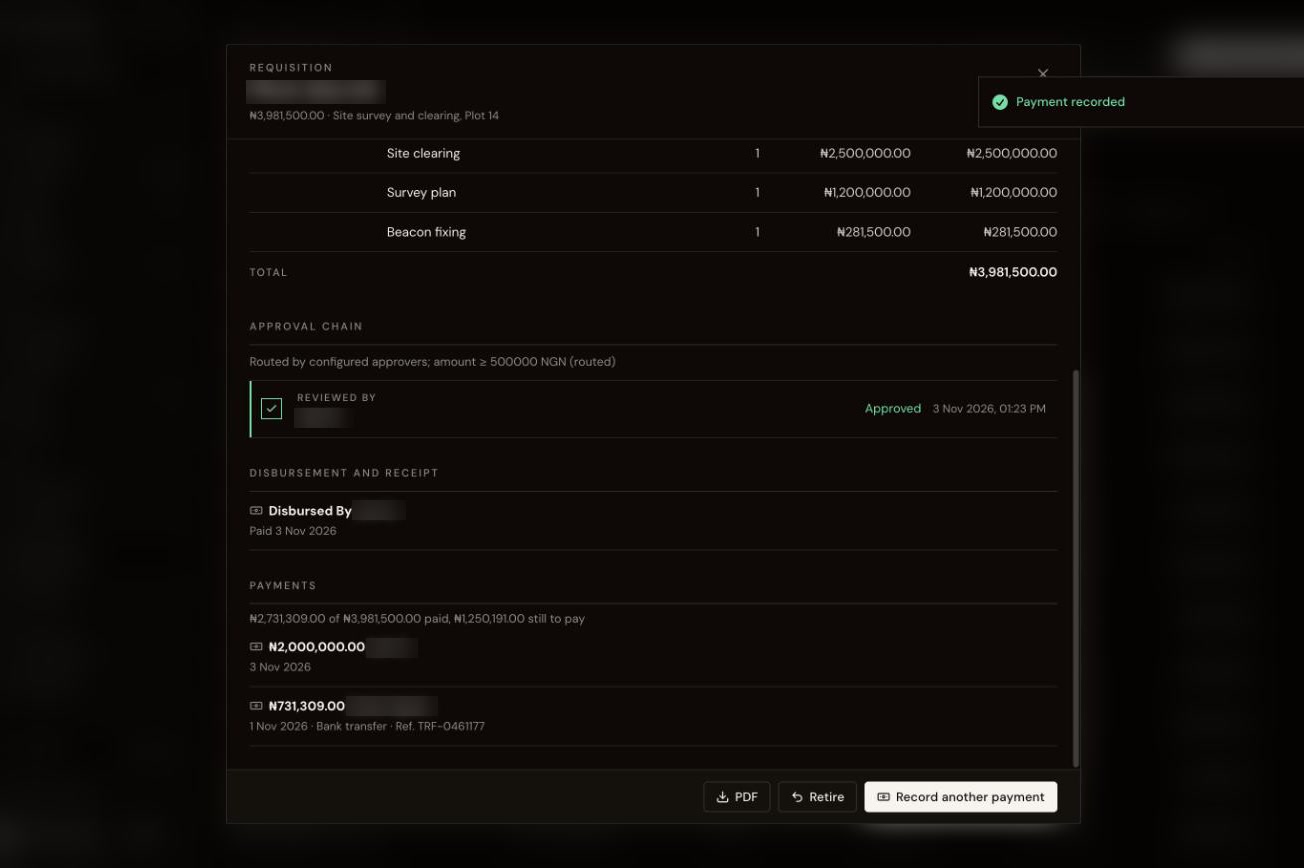
If VAT is held back until the end, pay the amount without VAT first and record the VAT as the last payment. The requisition does not label any of the balance as VAT. VAT is entered on the retirement.
Rules for payments
- You cannot pay more than is still owed. Spending above the approved amount is claimed on the retirement.
- You cannot pay a requisition where you are the requester. If the named payer is the requester, your firm’s backup payer pays it.
- Once the retirement has been submitted, no more payments can be recorded unless it comes back for changes.
- A confirmed payment cannot be edited on screen. If an amount or date is wrong, contact support with the requisition number.
Stage 4: Confirm receipt (staff advances)
For an advance to staff, the requester clicks Confirm receipt and signs once the money arrives. The status becomes Received. Your firm can switch this step off in the requisition workflow settings. When it is off, the requisition stays at Disbursed until it is retired.
Stage 5: Retire
A retirement reports what was really spent and settles the difference. An advance always needs retiring. A direct payment needs retiring when the final figures differ from what was paid. The requester or a workspace admin completes it; approvers and payers cannot do it for them.
- Open the requisition and click Retire.
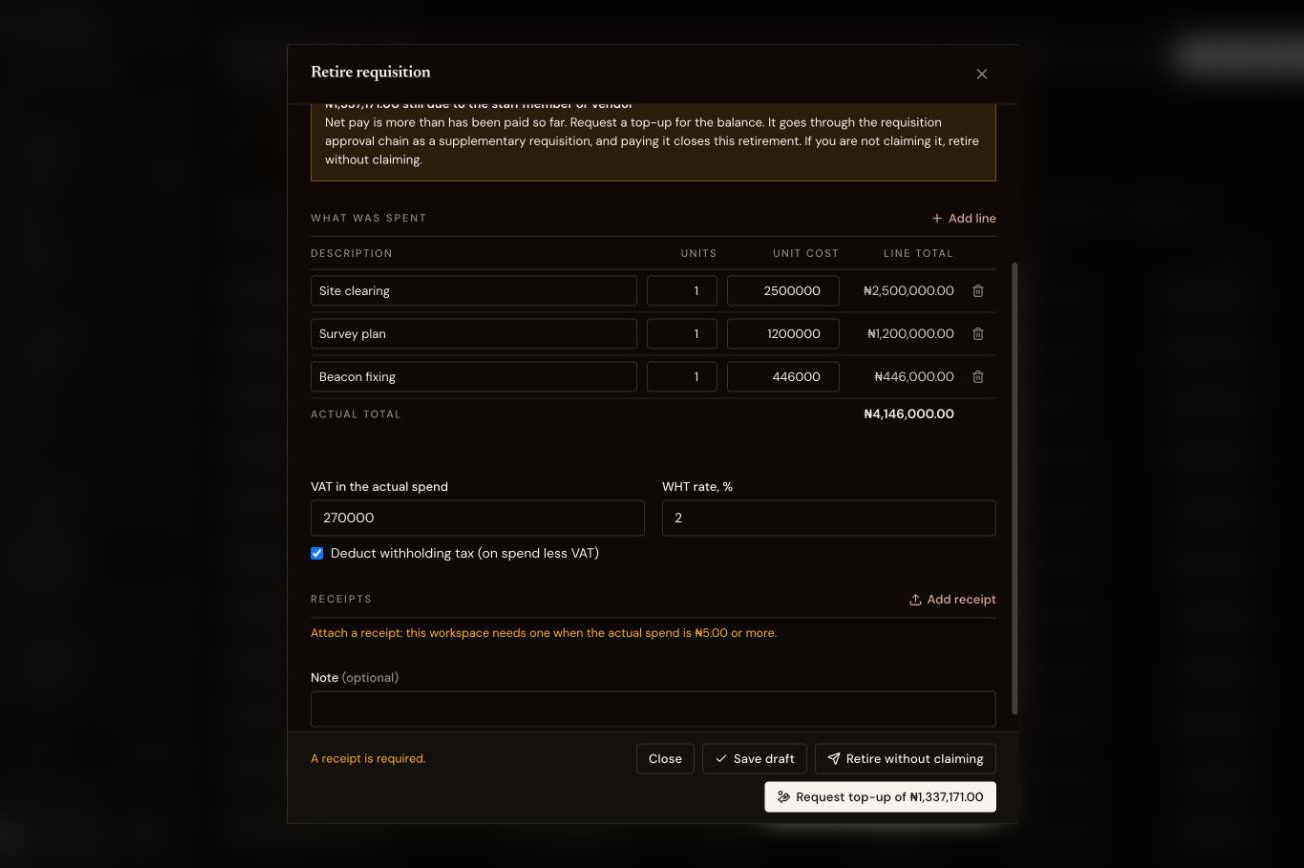
- Under What was spent, add a line for each cost. Use Add line for more.
- VAT in the actual spend: enter the VAT included in those lines. Leave it at 0 if there was none.
- Deduct withholding tax: check the tick box is right for this payment. WHT rate, % shows your firm’s rate, which you can change for this retirement.
- Click Add receipt to attach receipts. Your firm can require them above a set amount.
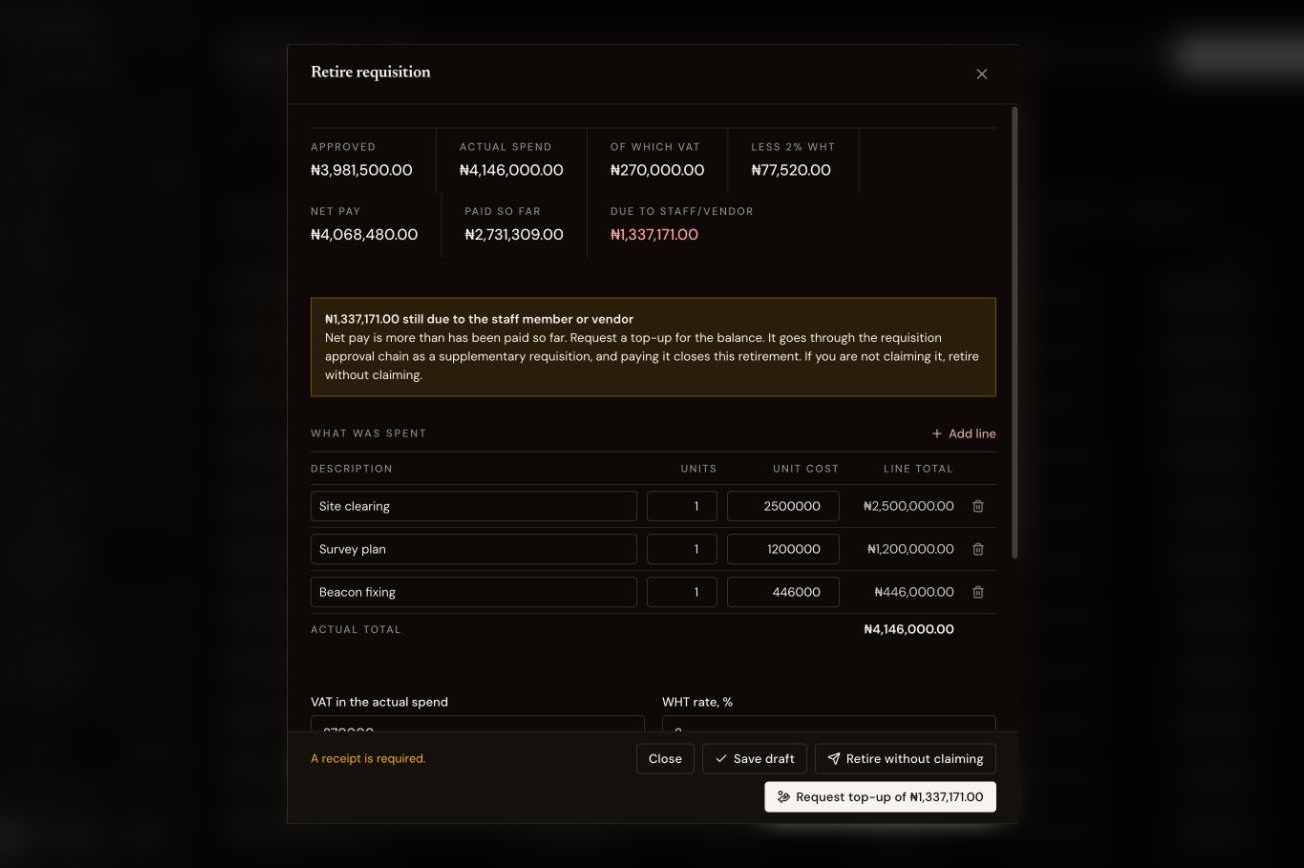
- Check the totals at the top, then choose the next step from the table in Stage 6.
How the figures are worked out
- WHT = (actual spend less VAT) × WHT rate
- Net pay = actual spend less WHT
- Balance = net pay less everything paid so far
Worked example
| Approved | 3,981,500 |
| Payment 1 | 2,000,000 |
| Payment 2 | 731,309 |
| Paid so far | 2,731,309 |
| Actual spend | 4,146,000 |
| of which VAT | 270,000 |
| Less 2% WHT: (4,146,000 less 270,000) × 2% | 77,520 |
| Net pay: 4,146,000 less 77,520 | 4,068,480 |
| Due to staff/vendor: 4,068,480 less 2,731,309 | 1,337,171 |
Stage 6: Settle and close
| The totals show | What to do | What happens next |
|---|---|---|
| Due to the firm | Fill in the amount returned, method and reference, then click Submit for approval | The retirement is approved. Finance confirms the full balance is back and clicks Close and retire. |
| Nothing due | Click Submit for approval | The retirement is approved, then finance closes it. |
| Due to staff/vendor | Click Request top-up | A top-up requisition goes for approval, then to finance. Paying it closes the retirement. |
| Due to staff/vendor, not claiming | Click Retire without claiming | It goes through approval like a normal retirement. Nothing more is paid. |
When the retirement closes, the requisition shows Retired. If your firm does not require approval for retirements, the button reads Record retirement and it goes straight to finance to close.
Top-ups
- A top-up has its own number, based on the original with a suffix such as -S1.
- It is paid in full, in one payment.
- If it is declined or sent back, the retirement reopens with the comment at the top. Correct it and request the top-up again; it keeps the same number.
- The top-up covers the whole balance, including any approved amount that was never paid. To keep it to the overspend alone, record the rest of the approved amount as a payment before you retire.
Retirements and top-ups can follow their own approval chains. The original requisition amount decides which chain applies, not the amount spent or the size of the top-up.
For admins: settings
All of these are under Settings, Approval Policy. Each card has its own Save.
| Setting | What it controls |
|---|---|
| Requisitions, Retirements, Top-ups | Who approves each, and any amount-based routing |
| Who disburses, Backup disburser | Who records payments, and who pays when the payer raised the requisition |
| Received By switch | Whether staff confirm receipt of an advance |
| Require a receipt above | The spend at which a receipt is required. Zero turns the check off. |
| Withholding tax (WHT) rate, % | The starting rate on new retirements |
| Deduct WHT on payments to vendors | Ticked by default |
| Deduct WHT on cash advances to staff | Unticked by default |
The WHT settings are starting values. The person retiring can still change them on a single retirement, and retirements already started keep their own setting.
Common questions
Why can’t I see Record payment?
Either the requisition is not approved yet, you are not a named payer, or it is your own requisition. The button only appears for someone allowed to pay it.
Does a part payment need new approval?
No. Payments up to the approved amount need no further approval. Only a top-up goes back through approval.
Why does it say a receipt is required?
Your firm requires a receipt at or above a set amount. Attach one with Add receipt before you submit.
What about requisitions paid before part payments existed?
They count as paid in full on their original disbursement, and their retirement figures do not change.