A requisition is a formal request to pay money: staff stipends, vendor payments, staff advances, and similar spend. You fill it in, it goes to the right people to approve and sign, and it prints to a clean PDF. This guide walks you through creating one from start to finish. You will find it in the Case Manager, under Requisitions in the left sidebar. It is available on the Professional plan.
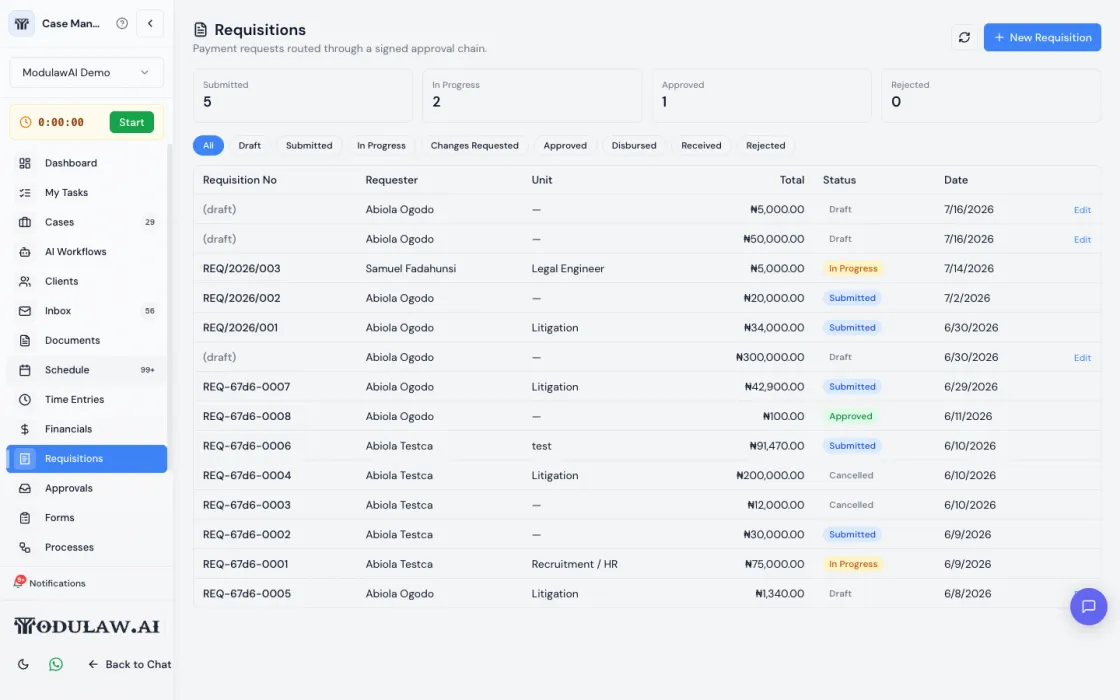
Step by step: create and submit a requisition
- In the Case Manager, click Requisitions in the left sidebar.
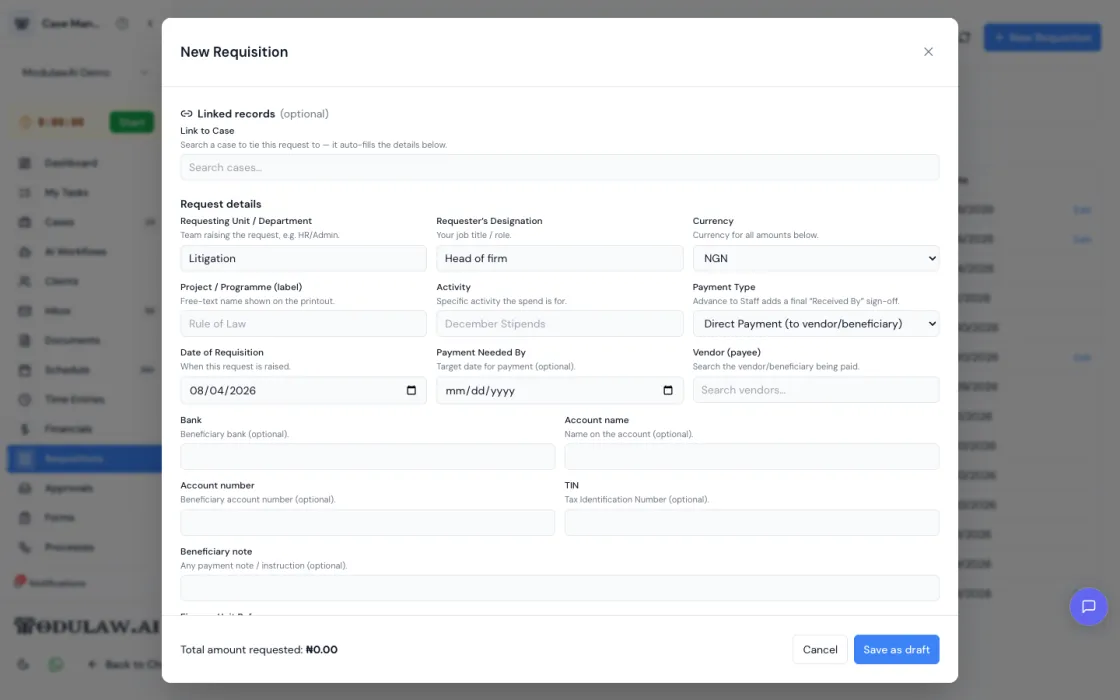
- Click the New Requisition button at the top right. A form opens.
- Link to Case (optional). If this payment belongs to a specific matter, search for it in “Link to Case” and select it. If it does not, leave this blank.
- In Requesting Unit / Department, type the team raising the request, for example “Litigation” or “HR / Admin”.
- In Requester’s Designation, type your job title, for example “Head of Firm”.
- Choose the Currency for the amounts.
- Type the Project / Programme name and the Activity the money is for, for example “December Stipends”.
- Choose the Payment Type: pick Direct Payment to pay a vendor or beneficiary, or Advance to Staff if you are giving money to a staff member (this adds a final “Received By” sign-off at the end).
- Fill in the beneficiary details: who is being paid, their bank, account name, account number, and TIN if you have them. These are optional but they appear on the printout.
- Add your line items. For each thing being paid, enter a description and an amount. The total updates automatically at the bottom of the form.
- Click Save as draft. Your requisition now appears in the list with the status Draft.
- To send it for approval, open the requisition from the list and submit it. It moves to In Progress and the first approver is notified automatically.
Tip: reuse an expense you already recorded
If the spend is already recorded as an expense on a case, you can import it as a line item instead of typing it again. The link back to that expense is kept, so the same amount is never billed to the client twice.
What the statuses mean
- Draft: saved but not yet sent for approval.
- In Progress / Submitted: sent, and moving through the approvers.
- Changes Requested: an approver sent it back to you with notes. Edit it and resubmit.
- Approved: signed off. The PDF now carries the signatures and stamp blocks.
- Disbursed / Received: paid out, and (for advances) confirmed received.
- Rejected / Cancelled: declined, or withdrawn.
- Enable Approval System. The master switch at the top. Leave it on so items route for sign-off.
- Under Item Type Configuration, switch on Requisitions. This opens its settings.
- Workflow Type. How the chain runs. Sequential (chain of approvals) contacts approvers in order, and each must approve before the next is notified. Other modes let a single person decide, or several act in parallel.
- Approvers. Add them in the order they should sign. Each entry can be a Role (for example Case Manager or Organization Admin), a Department, a Job title, or a specific Person. Roles and departments act as pools; job titles and people resolve to one position. Reorder with the arrows.
- Amount-based routing (optional). Add thresholds so larger amounts go to more senior approvers. The highest threshold an amount clears (in its currency) applies. With no thresholds, the approvers above apply to every amount.
- Conditional routing (optional). Tick to require extra approval when the linked case is High or Urgent priority, or when the client is VIP or premium tier.
- Escalate if not actioned in time. Tick this so a requisition that sits too long chases and escalates on its own.
- Preview chain. Enter an amount and click Preview to see exactly who would be asked to approve it, before you save.
- Click Save Changes. New requisitions now follow this policy. (Individual cases can override the workspace default.)
Approvers review your requisition in the Approvals area. If you want to understand how the approval chain works, read the Approvals guide.
Settings: how requisitions get approved
Before you rely on requisitions, an administrator should set the approval policy once for the workspace. Go to Settings, then Approval Policy (this tab is admin only). Everything below is configured there.
Delegation: let an assistant raise requisitions for you
In Settings, then Delegation, you can let an assistant act on behalf of a principal. The assistant raises the requisition, it is recorded under the principal’s name, and the assistant is tracked for audit. Click Add delegation, choose the assistant, choose who they can raise on behalf of, and confirm it applies to Requisitions.
Turning the module on or off
Settings, then Modules, controls whether Requisitions appears at all and which roles can see it.
Who can use it
Requisitions are a Professional-plan feature. On the Essential plan the module is hidden. By default it is available to Super Admins, Organization Admins and Case Managers. Team Members do not see Requisitions unless an administrator grants the role in Settings.