The vendor list is where your firm keeps the people and companies it pays. Bills, purchase orders and requisitions all draw on it, so details are typed once and only approved vendors can be paid. Open it from Firm tools, then Vendors.
What you can do with vendors
| You want to | You need |
|---|---|
| See the vendor list | Access to Firm tools |
| Add, import or edit vendors, and add documents | The Manage vendors permission |
| Approve or reject vendors | The Approve vendors permission, or to be a named approver in your approval policy |
| Add a custom field through an import | The Manage settings permission |
| Remove a document someone else added | The Approve vendors permission |
Owners and admins hold all of these. To give them to someone else, see Permission policies: control who can do what.
Find a vendor
The Vendors tab lists each vendor with their phone, approval state and bank.
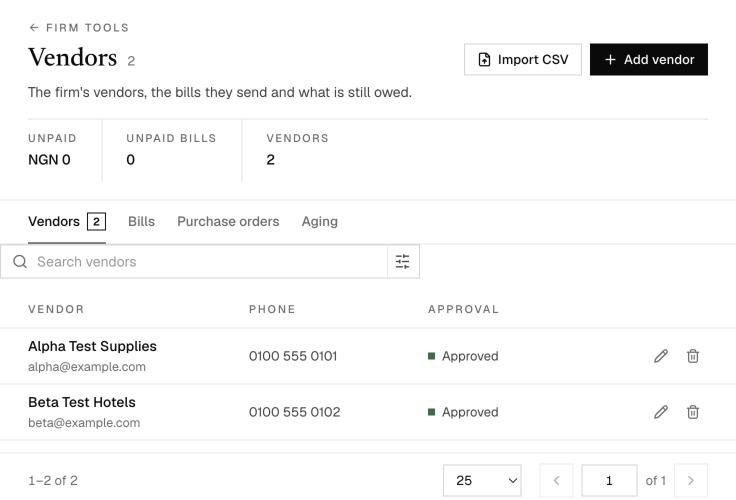
- Search looks through the name, email, phone, vendor code, contact person, services, category and location.
- Filters narrow the list by approval state, category or location. Category and location options come from your own vendors, so fill those fields in to make them useful.
- When vendors are waiting, an awaiting approval button shows how many and takes you straight to them.
Add a vendor
- Click Add vendor.
- Enter the Name. It is the only required field.
- Add what you have: contact details, what they supply, payment details and any custom fields.
- Click Add vendor to save.
To change a vendor, click its row. To add documents to a new vendor, save it first, then open it again.
What each field is for
| Section | Field | What it does |
|---|---|---|
| Vendor | Name | How the vendor appears everywhere, and the name on bills, purchase orders and requisitions |
| Vendor | Email, Phone, Address | How to reach them. A purchase order can be emailed to the address here |
| Vendor | Vendor code | Your own short reference. It must be unique in your firm, and it is the most reliable way to match on import |
| Vendor | Contact person, Their role | Who you deal with, shown on purchase orders |
| What they supply | Category | A grouping such as Hotel or Caterer. It becomes a filter |
| What they supply | Location or state | Where they operate. It becomes a filter |
| What they supply | Services or specification | What exactly they provide. It can be searched |
| Payment details | Bank, Account name, Account number, Bank code | Copied to a requisition when the vendor is picked. A change by a non-admin needs approval |
| Payment details | Tax ID or TIN | Copied to a requisition, and used as the vendor ID on purchase orders |
| Payment details | Notes | For your firm only. Notes are not copied to requisitions |
Who approves a vendor
Only an approved vendor can be paid on a bill, purchase order or requisition.
| What happens | Result |
|---|---|
| An admin adds, imports or edits a vendor | Approved straight away |
| Anyone else adds or imports a vendor | Waits for approval and cannot be paid until then |
| Anyone else changes the bank, account name, account number or bank code of an approved vendor | Goes back for approval |
| Anyone else edits a rejected vendor | Goes back for approval |
If your firm has set approvers under Settings, Approval Policy, Vendors, they decide. Otherwise your workspace admins do, and the first to act decides. See Approvals: review and sign off.
Approve or reject
- Open the Vendors tab and click the awaiting approval button, or use the link in your notification.
- Open the vendor to check the details and documents.
- Use the tick at the end of the row to approve, or the cross to reject.
- When rejecting, give a Reason. It is required, and the proposer sees it on the vendor.
What each state means
| State | Can be paid? | What to do |
|---|---|---|
| Approved | Yes | Nothing. It appears in the pickers on bills, purchase orders and requisitions. |
| Awaiting approval | No | Wait for an approver. |
| Rejected | No | Open the vendor, read the reason, fix the details and save. That sends it for approval again. |
Import vendors from a CSV
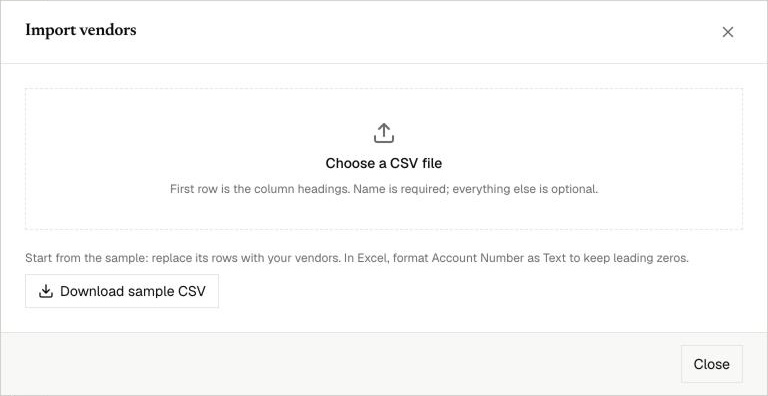
- On the Vendors tab, click Import CSV.
- Click Download sample CSV if you want a file with the columns already set up. Replace its example rows with your vendors.
- Choose your CSV file. The first row must be the column headings.
- Under Match your columns, check each field points at the right column. Most match on their own.
- Review New columns, if any appear. See below.
- Tick Update vendors that already exist if the file should change vendors you already hold.
- Check the first row preview, then click Import.
The columns can be in any order, and only Name is required. A file can hold up to 5,000 rows.
Column headings that match on their own
Capitals, spaces, full stops and underscores make no difference, so Vendor Code, vendor_code and VENDORCODE all match.
| Field | Heading to use | Also recognised |
|---|---|---|
| Name (required) | Name | Vendor, Vendor Name, Supplier, Supplier Name, Company, Company Name, Organisation, Business Name |
| Vendor code | Vendor Code | Code, Vendor ID, Supplier Code, Reference |
| Category | Category | Vendor Category, Vendor Type, Type, Group |
| Services | Services | Specification, Services Offered, Service, Expertise, Scope, Description |
| E-mail, Email Address, Mail | ||
| Phone | Phone | Phone Number, Phone No, Number, Contact Number, Mobile, Tel, Telephone, GSM |
| Contact person | Contact Person | Contact, Contact Name |
| Designation | Designation | Title, Role |
| Location | Location | State, Region, City, Country |
| Address | Address | Street, Office Address |
| Tax ID | TIN | Tax ID, Tax, VAT |
| Bank name | Bank Name | Bank |
| Account number | Account Number | Account No, Account, Acct No |
| Account name | Account Name | Acct Name |
| Bank code | Bank Code | Sort Code, Swift |
| Currency | Currency | CCY |
| Notes | Notes | Note, Comment, Comments, Remarks |
A worked example
Suppose your spreadsheet looks like this:
| Vendor Name | Bank | Account No | Tax Clearance | Insurance Expiry | Old Ref | |
|---|---|---|---|---|---|---|
| Example Hotels Ltd | bookings@example.com | Example Bank | 0012345678 | TCC-2026-01 | 2027-01-31 | |
| Example Caterers | food@example.com | Other Bank | 0098765432 | TCC-2026-02 |
- Vendor Name, Email, Bank and Account No match their fields on their own.
- Tax Clearance and Insurance Expiry appear under New columns, ticked and marked New field.
- Old Ref is not offered, because nothing is in it.
- Each vendor gets the two new fields. Example Caterers shows Insurance Expiry empty, ready to fill in later.
Before you import
- Account numbers: Excel removes leading zeros. Format that column as Text before you save, and check the first row preview.
- Currency: a blank cell is saved as NGN, so fill it in for vendors you pay in another currency.
- File type: save as CSV, not as an Excel workbook.
- Sample rows: delete the two example rows, which are marked “delete this row”.
New columns become custom fields
A column that matches no vendor field appears under New columns, so nothing is lost and nothing is added without you seeing it.
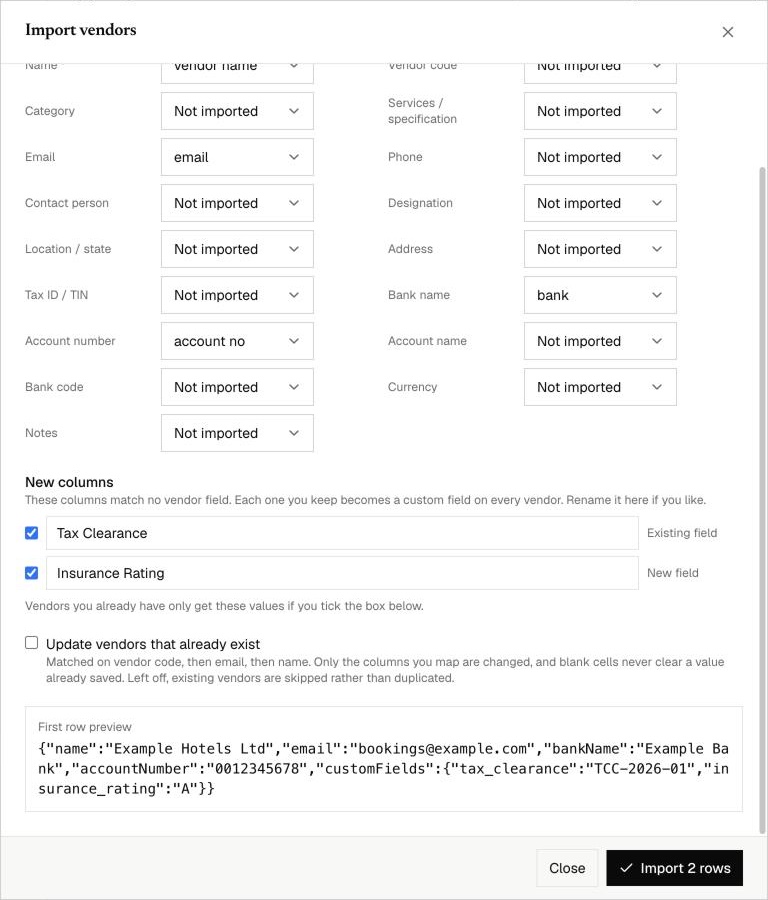
- Leave a column ticked to keep it. It becomes a custom field on every vendor, not only the ones in this file.
- Change the name in the box if you want it to read differently.
- Untick a column to leave it out.
- Existing field means your firm already has that field, so the values go straight into it.
- A column with nothing in it is not offered.
Only someone who can manage workspace settings can add a field. Anyone else sees new columns greyed out, and those columns are not imported. Their import still fills fields that already exist.
Vendors you already have
Each row is compared with your list by vendor code, then email, then name. An email shared by vendors with different names is not used to match.
| Update vendors that already exist | A row that matches |
|---|---|
| Left off | Is skipped. Nothing changes, and no duplicate is created. |
| Ticked | Updates that vendor. Only columns you imported change, and a blank cell never clears a saved value. |
To add a new column’s values to vendors you already hold, tick this box.
After the import
The window shows how many vendors were created, updated and skipped, any fields added, and the rows that failed with the reason. Up to 20 failures are listed. Row 1 is your first vendor, not the heading, so row 3 in the list is row 4 in your spreadsheet.
Custom fields
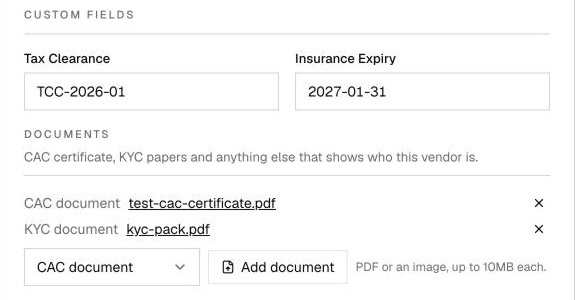
Custom fields hold whatever else your firm tracks about a vendor, such as a tax clearance number or an insurance expiry date. They appear on the vendor form, under Custom fields, for every vendor. A vendor that had no value in the import shows the field empty, ready to fill in. Clear a value and save to remove it.
Imported fields hold plain text.
Documents
Keep the papers that show who a vendor is on their record: the CAC certificate or other company registration, KYC documents, and anything else your due diligence needs.
- Open the vendor. If it is new, save it first.
- Scroll to Documents.
- Choose CAC document, KYC document or Other.
- Click Add document and pick the files.
Documents save as soon as you add them, so you do not need to click Save. Files can be PDFs or images (JPEG, PNG or GIF), up to 10MB each, with up to 30 on a vendor.
Anyone who can manage vendors can add a document. Only an admin or the person who added it can remove it. Adding and removing are recorded in the audit log.
Anyone holding a document’s link can open it, so share links with care.
A due diligence routine
A simple way to keep your vendor list reliable:
- Collect the company registration or CAC certificate and KYC papers when you take on a vendor.
- Add the vendor, then open it and add the documents.
- Track what expires with custom fields, such as a tax clearance number or an insurance expiry date.
- Have the approver open the documents before approving.
Pay a vendor from a requisition
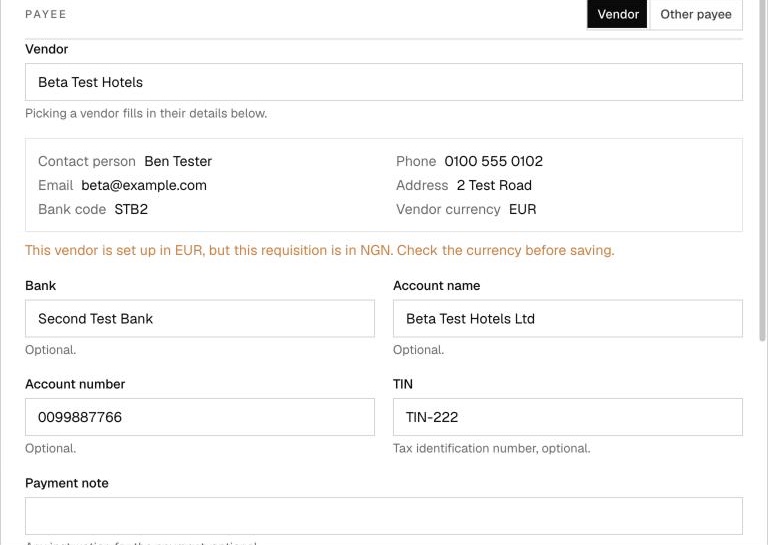
- On a new requisition, leave the payee type on Vendor and search for the vendor.
- Picking a vendor fills in the Bank, Account name, Account number and TIN.
- The rest of their record appears in a panel below the vendor: code, category, services, contact, phone, email, location, address, bank code and currency.
- The bank fields can be changed on this requisition. That does not change the vendor’s record.
- To correct the panel, edit the vendor, then pick them again.
- Picking a different vendor replaces everything. Details you typed before picking any vendor stay in place, and only empty fields fill.
- Switching to Other payee or to an advance to staff clears the vendor’s details.
- The requisition keeps its own copy. Editing the vendor later does not change a requisition already raised.
If the vendor’s currency differs from the requisition’s, a warning appears. The requisition’s currency does not change on its own, so check it before you save.
For the rest of the journey, see From requisition to retirement: the full guide.
What happens as you change the payee
| You do this | What happens to the details |
|---|---|
| Pick a vendor on an empty form | All their details fill in |
| Type bank details, then pick a vendor | What you typed stays, and only empty fields fill |
| Pick the same vendor again | Your changes stay, and only empty fields fill |
| Pick a different vendor | Everything is replaced, even with blanks |
| Switch to Other payee, or pick a staff member | The vendor’s details are cleared. Your payment note stays |
Where the details appear afterwards
- The requisition’s details view shows all of them.
- The PDF shows the bank, account name, account number, TIN, bank code, vendor code, contact, phone, email and address.
Delete a vendor
Click the bin at the end of the row. A vendor with bills cannot be deleted, so remove or reassign those bills first. Deleting a vendor withdraws any approval request still open for them. Requisitions already raised keep their own copy of the details.
Troubleshooting an import
| What you see | Why | What to do |
|---|---|---|
| That file has no readable rows | The file has no heading row, or no vendors under it | Check the first row is headings and at least one row follows |
| Map the Name column before importing | No column matched Name | Choose your name column under Match your columns |
| Some rows have no name and will be reported as errors | Those rows have an empty name | Fill them in, or import and fix them afterwards. The other rows still import |
| Everything was skipped | Those vendors already exist | Tick Update vendors that already exist and import again |
| Columns landed in the wrong field | A heading matched something you did not expect | Change it under Match your columns, or choose Not imported |
| Too many rows | The file is over 5,000 rows | Split it into smaller files |
| Strange characters in names | The file is not saved as UTF-8 | In Excel, save as CSV UTF-8 |
A wrong column is hard to undo across hundreds of vendors, so check the first row preview before you import.
Common questions
Why can’t I find a vendor on a requisition?
Only approved vendors appear. Check its status on the Vendors tab.
Why did my new column not import?
Either it was unticked, or you do not have permission to add a custom field. Ask an admin to run the import.
Why are the account numbers one or two digits short?
Excel removed the leading zeros. Format the column as Text, retype the numbers, save and import again with Update vendors that already exist ticked.
Does importing update a vendor’s approval?
A non-admin’s new vendors wait for approval, and so do changes they import to an approved vendor’s payment details. The approvers get one notification for the whole import.
Can I undo an import?
Not in one step. Delete the vendors you do not want, or correct the file and import again with Update vendors that already exist ticked.
Can I rename or delete a custom field?
Not on screen yet. Contact support if you need one changed.
Why did my update send a vendor for approval?
You changed its payment details and you are not an admin. An admin or approver needs to confirm the change.
Can vendors upload their own documents?
Not yet. Someone at your firm adds them.